The Bubble-Wrap Pinwheel Painting transforms a simple piece of paper into a vibrant work of art. As you dab and twist the painted bubble wrap on paper, vibrant textures emerge, creating beautiful pinwheel prints. This fun activity is perfect for kids and helps them explore colors and textures while getting creative. To make your artwork even more special, consider checking out other creative ideas like water balloon pinwheel painting.
What Makes This Work
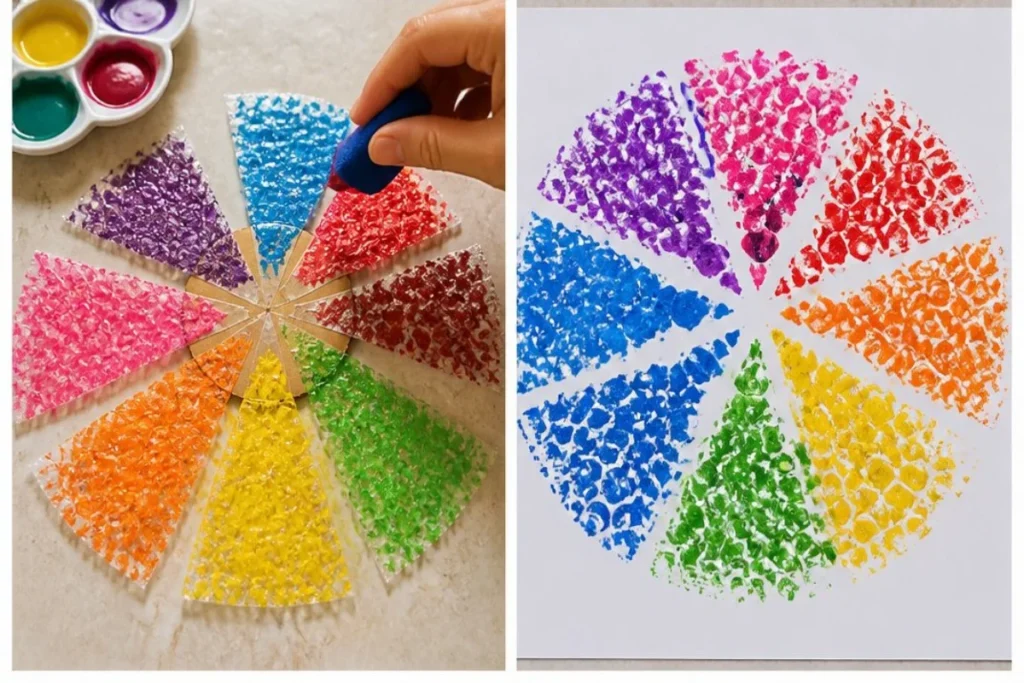
The beauty of this project lies in the interaction between paint and bubble wrap. The bubble wrap’s uneven surface creates unique patterns and textures, enhancing the visual appeal of the artwork. As you work, watch for how the paint spreads and mixes with other colors, creating dynamic effects. This activity not only fosters creativity but also introduces children to basic art concepts. You may also find Water Balloon Painting Cozy Pinwheel Art useful.
Materials
Gather the following materials to start your Bubble-Wrap Pinwheel Painting: You may also find Diy Flowers Salt Painting For Kids Cozy useful.
- Bubble wrap
- Washable paint
- Paper
- Scissors
- Cardboard circle
- Tape

You may also find Diy Flowers Salt Painting For Kids useful.
Steps
- Start by cutting the bubble wrap into wedge shapes. Tape these around your cardboard circle securely.
- Dab different paint colors into each section of the bubble wrap. Look for the moment when the color glides smoothly on the bubbles; this indicates it’s ready for printing.
- Press and twist the painted tool on paper to make beautiful textured pinwheel prints. Pay attention to how the paint transfers; each twist will create a unique pattern.
- Allow your art to dry completely before enjoying it. The colors will deepen and the texture will settle, giving your artwork a finished look.
What Goes Wrong and How to Fix It
Sometimes, the paint may not transfer well if it’s too watery. If this happens, use less water in the paint mix next time or check how much paint is on the bubble wrap; a thicker layer can enhance the transfer. If the prints are too light, try applying more pressure when twisting. Kids can help observe these changes and learn from the process.
Where to Display It
Once your Bubble-Wrap Pinwheel Painting dries, find a special spot to showcase it. Whether on a windowsill with sunlight sparkling through or a colorful wall gallery, displaying child-made artwork brings joy. Consider mixing this project with something like giant dot painting for an even more vibrant display.

Variations
You can experiment with different sizes of bubble wrap or even try using multiple colors to create gradients. Additionally, mix textures by incorporating other materials like sponge or fabric to explore new designs. This could lead to a fun multi-textured piece, broadening the experience of kids with various surfaces.
FAQs
Can I use regular paint instead of washable paint?
Yes, you can use regular paint, but washable paint is easier to clean up, especially with kids involved.
How can I store my artwork after it’s done?
Once dried, store your artwork flat in a portfolio to avoid damage or creases.
Why didn’t my colors mix as I hoped?
The amount of paint and how you dab it can affect mixing. Try varying the amount of paint or dabbing techniques in future attempts.
How long will the artwork last?
With proper care, the prints can last indefinitely. Displaying in a frame can protect them from damage.
Can very young children help with this project?
Yes, but they should be supervised throughout the painting process, especially during cutting.
What if I don’t have bubble wrap?
You can substitute with other textured materials like crumpled paper or textured sponge to achieve similar effects.
Conclusion
Creating art with your kids can be a bonding experience filled with learning and fun. If you’re looking for more creative inspiration, check out the collection of 40 summer art ideas for kids. For a different twist on bubble wrap, consider trying berry bubble wrap painting, which adds an edible element to the crafting experience.
Follow us on social for more DIY ideas & inspiration!
Bubble-Wrap Pinwheel Painting
Would you like to save this project?
By submitting you agree to receive this project and occasional emails. Unsubscribe anytime.
Materials
Materials for Painting
- 1 piece Bubble wrap Cut into wedge shapes
- 1 set Washable paint For easy cleanup
- 1 sheet Paper To create prints on
- 1 piece Cardboard circle To secure the bubble wrap wedges
- 1 roll Tape To attach bubble wrap to cardboard
Directions
Preparation
- Start by cutting the bubble wrap into wedge shapes. Tape these around your cardboard circle securely.
- Dab different paint colors into each section of the bubble wrap. Look for the moment when the color glides smoothly on the bubbles; this indicates it’s ready for printing.
Printing
- Press and twist the painted tool on paper to make beautiful textured pinwheel prints. Pay attention to how the paint transfers; each twist will create a unique pattern.
- Allow your art to dry completely before enjoying it. The colors will deepen and the texture will settle, giving your artwork a finished look.
Last Step: Don’t forget to leave a rating and comment below! It helps other readers find the best DIY projects — and it helps us too!