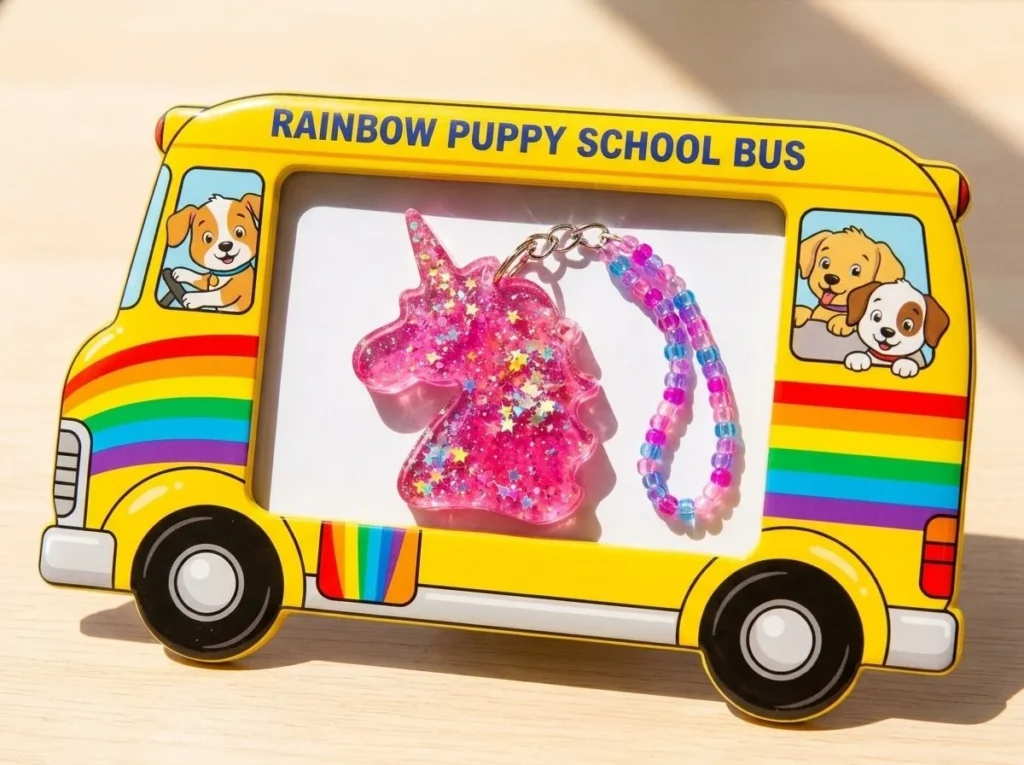
The Rainbow Puppy School Bus Photo Frame brings life and color to your shelf or window. With bright colors and a playful design, this project captivates everyone around. It serves as a perfect way to showcase your favorite first-day-of-school photo. As you build this craft, watch how the color transforms your craft sticks into a vibrant school bus. You may also find Rainbow Puppy Paw Salt Painting useful.
To start, gather your materials: 12 jumbo craft sticks, yellow acrylic paint, rainbow cardstock, clear blue acetate, clear pink cardstock, brown felt, glue, black buttons, and a school photo. Each material plays a unique role in creating this colorful frame.
Steps to Create Your Rainbow Puppy School Bus Photo Frame
Step 1: Glue the Craft Sticks
Begin by gluing the jumbo craft sticks together to form a rectangular shape that resembles a school bus. As you apply the glue, look for the way the sticks come together, creating a sturdy base.
Step 2: Paint the Structure
Once the glue is dry, paint the entire structure in bright yellow and let it dry. Notice how the color change instantly brightens your project and makes it more visually appealing.
Step 3: Cut Windows
Next, cut out windows from the clear blue acetate and carefully glue them into place. The transparency of the acetate adds a fun layer that brings a realistic touch to your school bus.
Step 4: Add the Puppy Face
Using the brown felt, create a cute puppy face and place it in one of the windows. The texture of the felt adds depth and character to your frame, making it even more delightful.
Step 5: Attach Wheels
Now, it’s time to add rainbow details and glue on the black buttons for wheels. Look out for how this simple detail transforms the bus from a flat shape to a three-dimensional craft.
Step 6: Insert the Photo
Finally, insert your favorite first-day-of-school photo behind the center window. The photo will pop against the colorful background, making your frame a cherished display piece.
Creating this craft is not only enjoyable but also educational. It incorporates principles of design and encourages creativity. For more ideas, check out this popsicle stick organizer for even more fun projects!
What Goes Wrong and How to Fix It
Sometimes, gluing the sticks can result in uneven edges. If this happens, you can gently sand the edges once dry to create a smoother finish. If the yellow paint streaks, allow it to dry completely and apply a second coat for a richer color. Always ensure that you follow the drying times on the glue and paint for the best results.
Where to Display It
This colorful frame shines on a shelf or in a window where light can pass through the clear blue acetate. It’s the perfect way to commemorate your child’s school milestones. For a fun addition to your back-to-school decorations, consider pairing this photo frame with a rainbow pencil bouquet.
Variations
This craft can be easily customized. Try using different colors for painting or making additional decorations with the rainbow cardstock. You could also create various animal faces from the felt to change the theme. For a spooky twist, consider transforming it into a glow lantern for Halloween!
FAQs
1. Can I use regular craft sticks instead of jumbo?
Yes, regular craft sticks can be used, but the structure will be smaller. Keep that in mind when cutting out windows and preparing your photo.
2. What should I do if my paint does not dry evenly?
If the paint does not dry properly, wait a little longer, then apply an additional coat. Make sure you are painting in a well-ventilated area with good lighting.
3. How can I fix messy glue lines?
If you notice extra glue, allow it to dry completely, then gently scrape it away with a craft knife. Be careful to avoid damaging your craft.
4. Can kids help with this project?
Definitely! Children can assist with most steps, like painting and gluing, under adult supervision to ensure safety while handling glue and other materials.
5. How long does this craft last?
This project can last for years if stored properly. Be mindful of humidity and avoid exposing it to extreme temperatures.
6. Can I make this project without felt?
Yes! If you don’t have felt, paper or fabric can substitute. Just ensure the material can hold its shape and glue well.
Conclusion
Creating the Rainbow Puppy School Bus Photo Frame is a fun and colorful project perfect for celebrating school days. To enhance your festive atmosphere, consider adding some back to school balloons or a customizable photo frame kit for extra flair. Enjoy crafting, and let your creativity shine!
Follow us on social for more DIY ideas & inspiration!

Rainbow Puppy School Bus Photo Frame
Would you like to save this project?
By submitting you agree to receive this project and occasional emails. Unsubscribe anytime.
Materials
Materials
- 12 pieces jumbo craft sticks These form the base structure.
- 1 bottle yellow acrylic paint Used to paint the frame.
- 1 sheet rainbow cardstock For additional decorations.
- 1 sheet clear blue acetate Used for the windows.
- 1 sheet clear pink cardstock Optional decoration material.
- 1 sheet brown felt To create the puppy face.
- 1 bottle glue For assembling the frame.
- 4 pieces black buttons Used as wheels.
- 1 photo school photo To be displayed in the frame.
Directions
Assembly
- Glue the jumbo craft sticks together to form a rectangular shape that resembles a school bus.
- Once the glue is dry, paint the entire structure in bright yellow and let it dry.
- Cut out windows from the clear blue acetate and carefully glue them into place.
- Using the brown felt, create a cute puppy face and place it in one of the windows.
- Glue on the black buttons for wheels.
- Finally, insert your favorite first-day-of-school photo behind the center window.
Last Step: Don’t forget to leave a rating and comment below! It helps other readers find the best DIY projects — and it helps us too!