Crafting beautiful crystal stars at home can be a fascinating project. As you observe the growing crystals, watching them shimmer in the light is truly enjoyable. This tutorial will guide you step by step through the process of creating your very own crystal star. You’ll see how simple materials can transform into a stunning decorative piece. You may also find How To Create Cozy Rainbow Crystal Roses At Home useful.
What Makes This Work
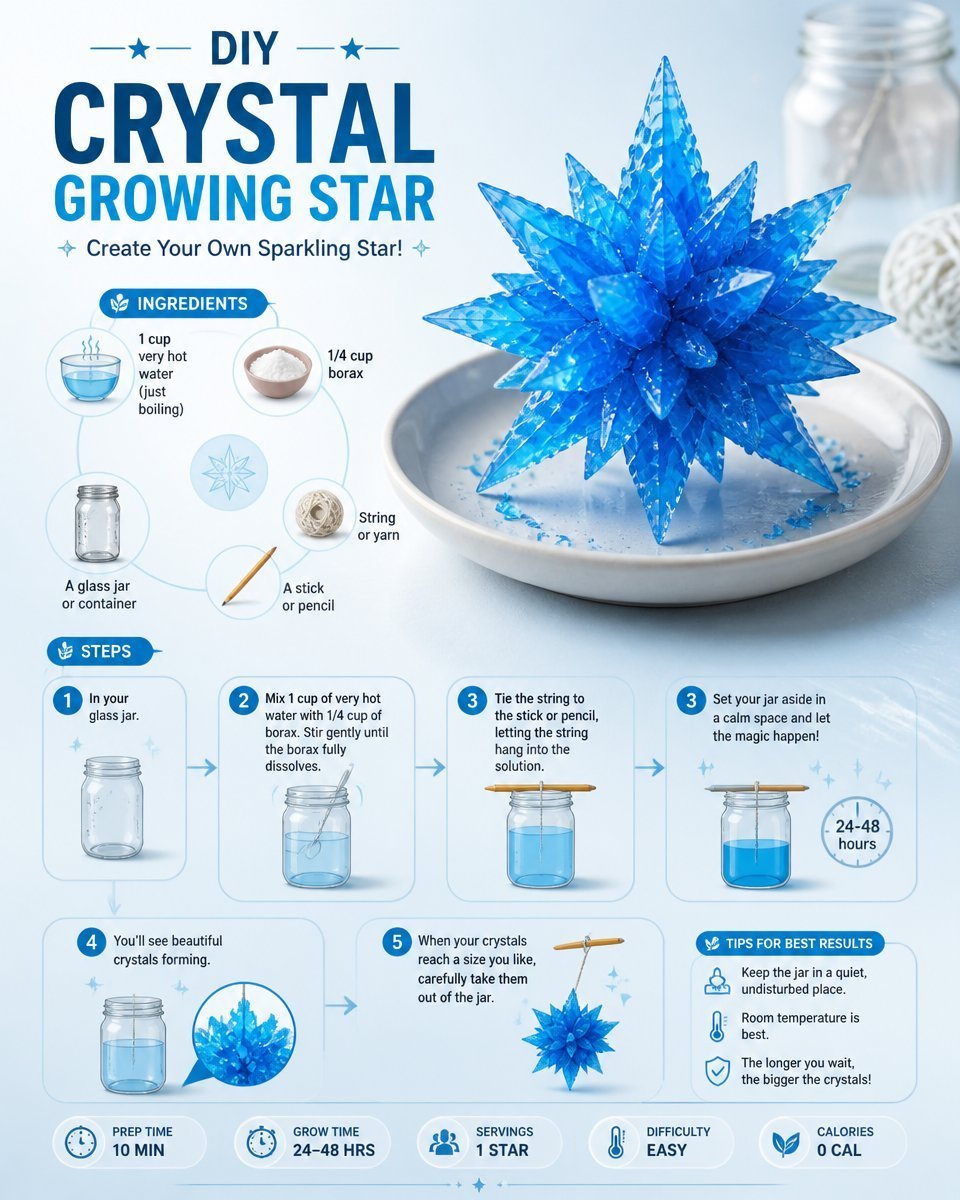
The magic of this project lies in the nature of crystals, specifically how borax dissolves in hot water and forms solid crystals as the solution cools. When the solution is saturated and begins to cool, borax particles bond together, creating the beautiful shapes of stars. It’s an exciting fusion of art and science that makes crafting a crystal star not only creative but also educational. You may also find How To Make Rainbow Crystals At Home useful.
Materials
To create your crystal star, you will need: You may also find Easy How To Baking Soda Crystal Heart Growth useful.
- Borax powder
- Water
- A clear jar
- A string or pipe cleaner shaped like a star
- A spoon
- A pot for boiling water
These supplies are easy to gather, and you might even have some on hand. You may also find How To Make Baking Soda Growing Tree Diy useful.
Steps
Boil Water: Begin by boiling about two cups of water in a pot. Ensure you have an adult help if you’re using a stove. You may also find How To Make Diy Blue Crayon Suncatchers Deco useful.
Mix Borax: Add approximately 3 tablespoons of borax to the boiling water and stir until it completely dissolves. This creates a saturated solution. The solution should be clear and free of any undissolved particles.
Prepare the Star Shape: If you are using a pipe cleaner, shape it into a star. If you’re using string, you might need to tie it around a mold.
Submerge the Star: Carefully lower your star structure into the jar. Make sure it hangs freely without touching the bottom or sides.
Let It Sit: Allow the jar to sit undisturbed overnight. You will begin to notice the formation of crystals on your star over time.
Observe the Changes: Check your star periodically. As the solution cools, you will see the crystals starting to form, and they may change color or texture.

What Goes Wrong and How to Fix It
If your crystals do not form correctly, it might be because of too little borax in the solution. Ensure it is fully saturated. If the stars stick to the jar, you can gently twist them to loosen them without breaking the crystals.
Where to Display It
Once your crystal star has formed, you can showcase it on a window sill, where sunlight can enhance its colors. They also make wonderful gifts or ornaments for special occasions. A little sparkle can brighten any space.
Variations
You can experiment with different colors and shapes by using food coloring or varying the shape of your mold. For an added touch, consider making multiple stars in different sizes for a beautiful hanging display.
FAQs
Can I use other types of sugar besides borax?
Borax is the best option because it holds the right properties for crystal growth. Other substances may not yield the same results.
How long does it take for the crystals to form?
Most crystals will start to appear within a few hours, but the best results are achieved after letting them sit overnight for at least 24 hours.
What if my star doesn’t stay in the center?
If your star drifts to one side, reposition it carefully after the initial setup or use a bit of adhesive to hold it in place while the crystals form.
Will children be able to do this alone?
While older children can help, adult supervision is recommended due to boiling water and the handling of borax.
How can I make this a more colorful project?
You can add food coloring directly into the borax solution to achieve vibrant crystal colors.
What should I do if my crystals looked cloudy?
If this happens, it may mean the solution was not saturated enough. Start over and ensure enough borax is dissolved this time.
Conclusion
Creating crystal stars is a beautiful way to blend science and art. You’ll enjoy the mesmerizing process of watching them grow and shine. If you’re interested in similar projects, check out this guide on How to Make Crystal Stars | Borax Crystal Ornaments and discover a festive Borax Star Ornaments: Christmas Science Project!
Follow us on social for more DIY ideas & inspiration!

Crystal Stars
Would you like to save this project?
By submitting you agree to receive this project and occasional emails. Unsubscribe anytime.
Materials
Main Materials
- 3 tablespoons Borax powder Essential for crystal formation.
- 2 cups Water Boiled for saturation.
- 1 clear jar A clear jar To hold the crystal solution.
- 1 piece String or pipe cleaner shaped like a star This will form the shape of the crystal star.
- 1 spoon A spoon For stirring the borax into the water.
- 1 pot A pot for boiling water Ensure adult supervision is present.
Directions
Preparation
- Boil about two cups of water in a pot.
- Add approximately 3 tablespoons of borax to the boiling water and stir until it completely dissolves.
- If using a pipe cleaner, shape it into a star. If using string, tie it around a mold.
- Carefully lower your star structure into the jar, ensuring it hangs freely without touching the bottom or sides.
- Allow the jar to sit undisturbed overnight.
- Check your star periodically as the solution cools.
Last Step: Don’t forget to leave a rating and comment below! It helps other readers find the best DIY projects — and it helps us too!