Crystal Seashells: A Guide to Collecting Seashells can turn an ordinary collection into a vibrant display piece. As you create these beautiful shells, watch the dazzling colors emerge, making each one unique. This project combines art and science, resulting in a group of glowing decorations perfect for any shelf or window. You may also find How To Make Sugar Crystal Experiment Guide useful.
What Makes This Work
The key to this project lies in the use of borax, which crystallizes and forms the beautiful shell shapes. As the mixture cools, you’ll notice a transformation in texture and color, adding a sparkling effect to the shells. Understanding the materials helps explain why some crystals grow larger or take on different colors during the process. You may also find How To Make Firefly Bottle Lights Diy Guide useful.
Materials
Gather these materials before you start:
- Borax
- Water
- Glass jar or container
- Straws or sticks (for shaping)
- Seashells or shell molds
- Food coloring (optional)
Make sure to have an adult supervise when handling hot water or borax, especially when pouring the mixture into jars.
Steps
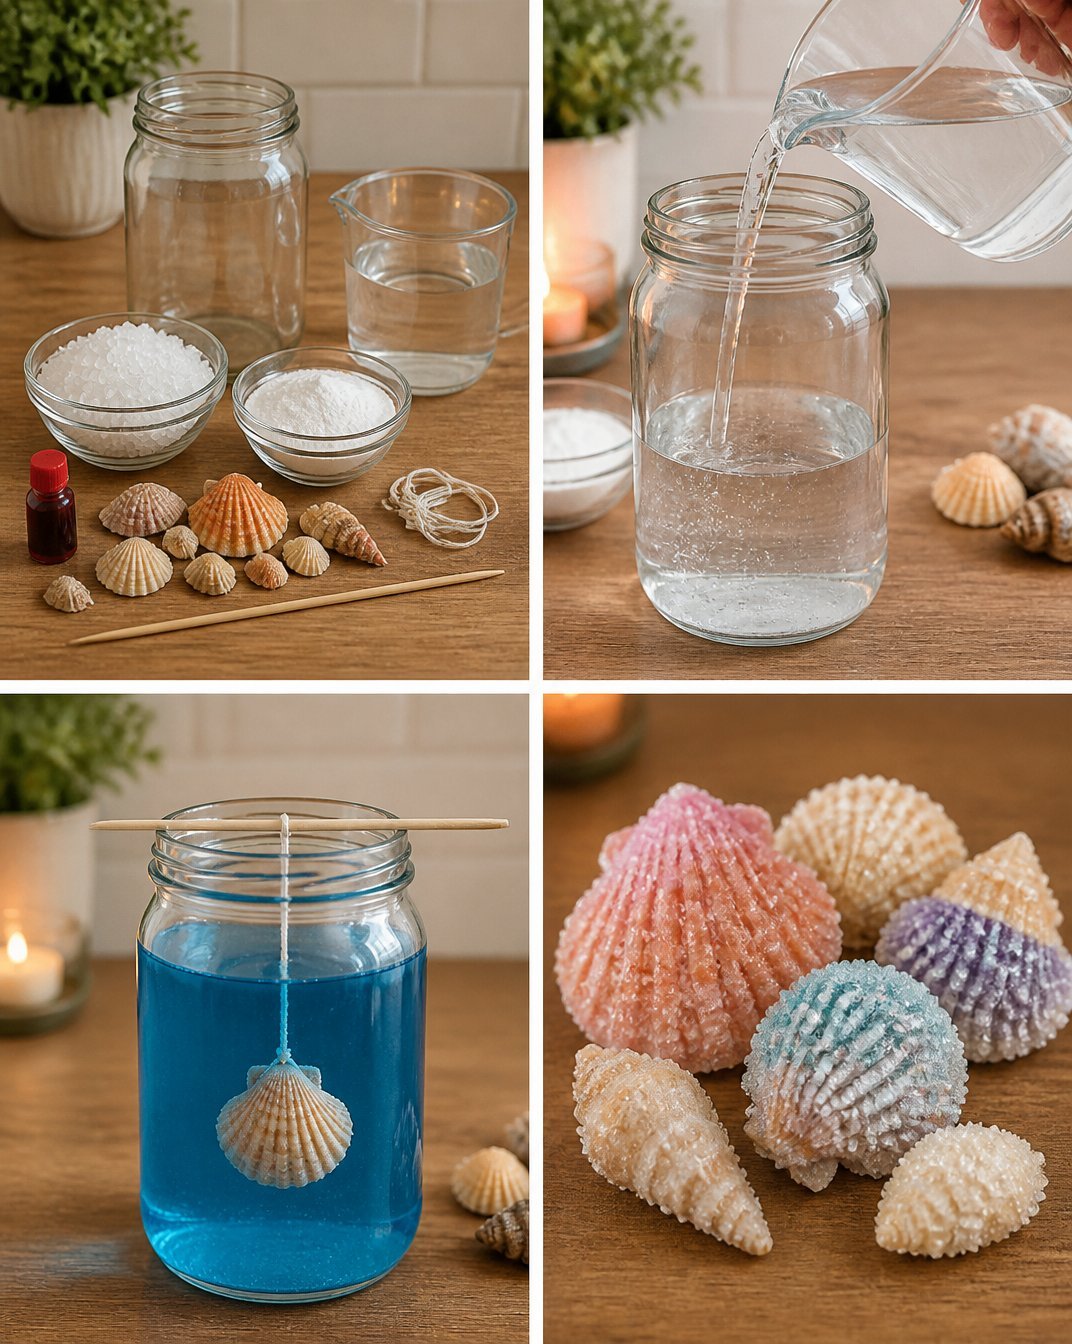
Prepare Your Jar: Begin by cleaning your jar or container, ensuring it’s free from dust or residues. This cleanliness allows for the best crystal formation.
Mixing the Solution: In a separate pot, heat water until it’s almost boiling. Gradually add borax to the hot water, stirring continuously until it dissolves completely. You should see a slight thickness forming in the mixture.
Adding Color: If you want vibrant colors in your shells, add a few drops of food coloring to the solution. Look for the water to change color and deepen in hue.
Placing the Shells: Using your straws or sticks, dip the shells into the solution. Ensure they are fully submerged and can rest without touching the sides of the container. This is crucial for even crystal growth.
Waiting for the Magic: Cover your jar with plastic wrap to minimize evaporation. Allow it to sit undisturbed for 24 hours. During this time, watch for the shells to change as crystals form.
Removing and Drying: After a day, carefully remove the shells and let them air dry on a paper towel. Note how they feel smooth with a bit of shine from the crystallized borax.
What Goes Wrong and How to Fix It
If your shells don’t seem to be forming crystals, the solution might not be concentrated enough. Simply reheat the remaining solution and add more borax until it dissolves. If you notice crystal growth on the jar’s sides instead of the shells, reduce the amount of shells or space them out further.
Where to Display It
Once your crystal seashells are ready, find a perfect display spot. Use a simple glass vase or arrange them in a shadow box. They can also adorn window sills, where sunlight enhances their glow. Consider arranging them with other items like sand or stones to create a full beach-themed decor.
Variations
You can experiment with different shell types or even make other crystal shapes. If you’re interested in other DIY projects, consider trying out how to make crystal seashells or explore easy DIY crystal seashells.
FAQs
Can I use different colors for the shells?
Yes, you can use any color of food coloring you like, or even mix different colors to create a tie-dye effect. Just ensure to mix it well in the solution.
How long do these crystal seashells last?
The crystal formations can last indefinitely if kept in a cool, dry place away from moisture. However, they may fade in color over time when exposed to direct sunlight.
What can I do if the crystals look too small?
If you want larger crystals, try using a more concentrated solution. This can be done by adding additional borax to your heated water until fully dissolved.
Is it safe for children to help with this project?
Yes, children can help, but they should always have adult supervision, especially when dealing with hot water or borax, as these materials need to be handled carefully.
Will using less water create bigger crystals?
Yes, reducing the amount of water while keeping the amount of borax the same can lead to larger crystal formations. Just remember that too much borax in a small amount of water will lead to a very thick solution.
How can I care for the crystal seashells?
To maintain their sparkle, avoid direct contact with water or strong cleaning agents. Dust them lightly with a soft cloth from time to time.
Conclusion
Creating colorful crystal seashells is an enjoyable project for families looking to combine creativity with science. For additional activities, check out the best shelling beaches in North Carolina for inspiration or read about recreational sea shell collecting to enhance your crafting experience.
Follow me on social for more recipe ideas & inspiration!

Crystal Seashells
Would you like to save this recipe?
By submitting you agree to receive this recipe and occasional emails. Unsubscribe anytime.
Materials
Materials
- 1 cup Borax Main crystallizing agent.
- 2 cups Water Heated to near boiling.
- 1 Glass jar or container For forming the crystals.
- Straws or sticks Straws or sticks (for shaping) Used to suspend the shells in the solution.
- 2-3 pieces Seashells or shell molds To create the crystal shapes.
- Optional Food coloring To add color to the crystals.
Instructions
Preparation
- Clean your jar or container to ensure it’s free from dust or residues.
Mixing the Solution
- Heat water until almost boiling in a separate pot.
- Gradually add borax to the hot water, stirring continuously until it dissolves completely.
- Observe a slight thickness forming in the mixture.
Adding Color
- Add a few drops of food coloring to the solution for vibrant colors.
Placing the Shells
- Using straws or sticks, dip the shells into the solution.
- Ensure the shells are fully submerged and do not touch the sides of the container.
Waiting for the Magic
- Cover the jar with plastic wrap to minimize evaporation.
- Allow it to sit undisturbed for 24 hours.
Removing and Drying
- Carefully remove the shells and let them air dry on a paper towel.
- Note how they feel smooth with a shine from the crystallized borax.
Last Step: Don’t forget to leave a rating and comment below! It helps other readers find the best recipes — and it helps us too!
Tips & Notes:
Nutrition Information: Serving: | Calories: | Carbohydrates: | Protein: | Fat: | Sodium: | Fiber: | Sugar:
Nutritional information is provided as a courtesy and calculated automatically. Values can vary depending on the brands and ingredients you use, so if you’re tracking closely, I recommend calculating with your own preferred tool.