Glow-in-the-Dark Crystal Fairy Garden Jar
Imagine a warm evening, the sun setting, and the air filled with colorful sparkles that dance and shimmer in the fading light. Now, picture a jar glowing softly in the dark, filled with glittering stones and miniature plants. This is the magic of creating a Glow-in-the-Dark Crystal Fairy Garden Jar. With just a few simple steps, you can bring a whimsical touch of wonder to your home, perfect for those cozy family nights. Let’s dive into this project that invites creativity and imagination!
Why Make This Glow-in-the-Dark Crystal Fairy Garden Jar
Crafting a Glow-in-the-Dark Crystal Fairy Garden Jar is more than just a fun project; it’s a vibrant adventure for the whole family. Children and adults alike can explore the joy of creating something beautiful and unique. This project combines art with science, showing how light and materials can transform into something magical. The glowing elements not only delight the eyes but also spark conversations about colors, textures, and the science of light making it both creative and educational.

A Quick Look at How It Works
When you create a Glow-in-the-Dark Crystal Fairy Garden Jar, you engage in an exciting process of layering colors and textures. As you work, you’ll use glowing paint that absorbs light and then shines in the dark, giving the fairy garden an enchanting glow. Each step combines sensory exploration with visual delight, resulting in a vivid display when the lights go out. The simple science behind this showcases how certain materials, when mixed or painted, can interact with light to create stunning effects.
Materials You Will Need
Gathering supplies is just the start of your magical journey. Here’s everything you will need to create your own Glow-in-the-Dark Crystal Fairy Garden Jar:
- 1 large clear jar
- 1 cup decorative glass pebbles
- Glow-in-the-dark paint
- Iridescent stones
- Miniature faux plants
- Battery-powered micro fairy lights
Make sure to supervise younger ones with small parts or paint. All these materials are easy to find, and you can get creative if you want to substitute something!

Step-by-Step Directions
Creating your fairy garden jar is an exciting step-by-step process. Let’s bring those sparkles to life!
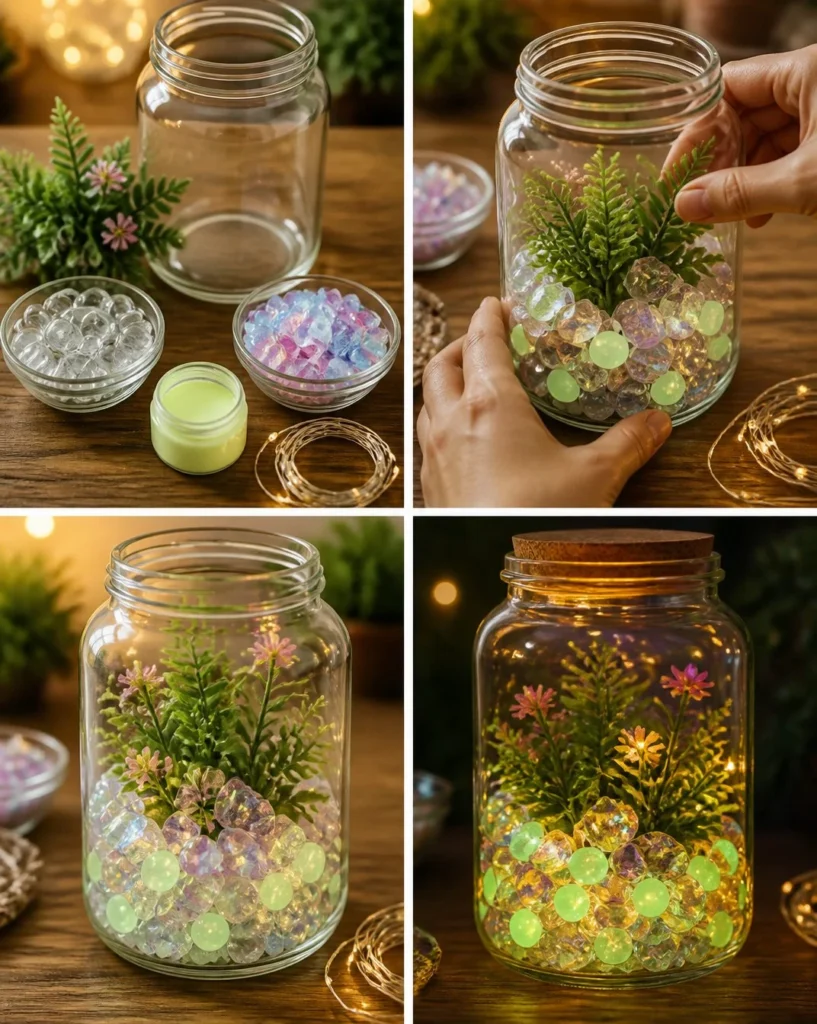
Dot several decorative glass pebbles with glow-in-the-dark paint. Let them dry completely. Watch how the paint makes the surfaces transform with color.
Layer the painted pebbles with iridescent stones inside the clear jar. See the light reflect off those stones, creating a mesmerizing display as you stack them.
Arrange the miniature faux plants among the stones to create a small fairy-garden scene. Feel free to switch up the arrangement until it looks just how you imagined!
Weave the battery-powered micro fairy lights carefully through the arrangement. Notice how the lights play off the stones and plants, adding another layer of sparkle.
Charge all the glow-painted details under bright light for a few minutes, then switch on the fairy lights for the nighttime display. Marvel at how the whole jar lights up when dark!
As you work, keep in mind that safety always comes first. If you’re using paints or small pieces, be sure that young hands have adult helpers around.
Displaying Your Finished Glow-in-the-Dark Crystal Fairy Garden Jar
Now that your Glow-in-the-Dark Crystal Fairy Garden Jar is complete, it’s time to find the perfect spot to showcase your creation. This jar makes a delightful addition to a nightstand, a windowsill, or even a garden table for magical evenings. You can dim the lights and watch it glow, creating a serene atmosphere. It also makes a wonderful gift for friends or family; just wrap it up with a pretty ribbon for a charming touch.
Keeping Your Glow-in-the-Dark Crystal Fairy Garden Jar Looking Great
Once you create this enchanting piece, you’ll want it to last. Store your fairy garden jar in a cool, dry place, away from direct sunlight, to keep the colors bright and the glow vibrant. If dust accumulates, you can gently wipe the outside of the jar with a soft cloth. Just remember to avoid using harsh chemicals or water on any of the glowing elements, as they can dull the shine.
Fun Tips and Colorful Variations
Here are some inviting ideas to explore next time you dive into making your Glow-in-the-Dark Crystal Fairy Garden Jar:
- Experiment with different sizes of jars for varied displays. A smaller jar can create a charming mini garden!
- When choosing stones or pebbles, try mixing different shades of glow-in-the-dark paint for a more colorful effect.
- Consider adding seasonal elements like tiny pumpkins for autumn or snowflakes for winter to keep your jar fresh and festive.
- Feel free to include little figurines or creatures that match the fairy theme, making the garden come to life even more.

FAQs About Glow-in-the-Dark Crystal Fairy Garden Jar
Will it really glow in the dark?
Yes! The glow-in-the-dark paint absorbs light and emits it slowly in a dark environment, creating a lovely glow.
Is it safe for kids?
Absolutely! Just be sure to supervise young children, especially when using small parts or paint.
How long does it take to make?
You can create your fairy garden jar in about an hour, but let the paint dry completely before layering for the best results.
Why didn’t mine turn out as expected?
If your glow isn’t bright, it could be due to insufficient charging time in bright light. Ensure you expose the painted pebbles to a strong light source for a while.
Can I modify the design?
Of course! Get creative with colors, sizes, and additional decorations to make it uniquely yours.
A Little Note Before You Go
Creating a Glow-in-the-Dark Crystal Fairy Garden Jar is all about fun and exploration. Embrace the process, invite your family to join in, and let your imagination run wild. Each jar can be a reflection of your wonderful personality and creativity. Enjoy every moment of crafting and remember, the magic truly happens when you make it your own!
Follow us on social for more DIY ideas & inspiration!
Glow-in-the-Dark Crystal Fairy Garden Jar
Would you like to save this project?
By submitting you agree to receive this project and occasional emails. Unsubscribe anytime.
Materials
For the Fairy Garden Jar
- 1 large large clear jar Any large clear jar will work for this project.
- 1 cup decorative glass pebbles
- 1 bottle Glow-in-the-dark paint Make sure the paint is safe for crafts.
- 1 package iridescent stones
- 5 pieces miniature faux plants
- 1 set battery-powered micro fairy lights Ensure they are battery-operated for safety.
Directions
Preparation
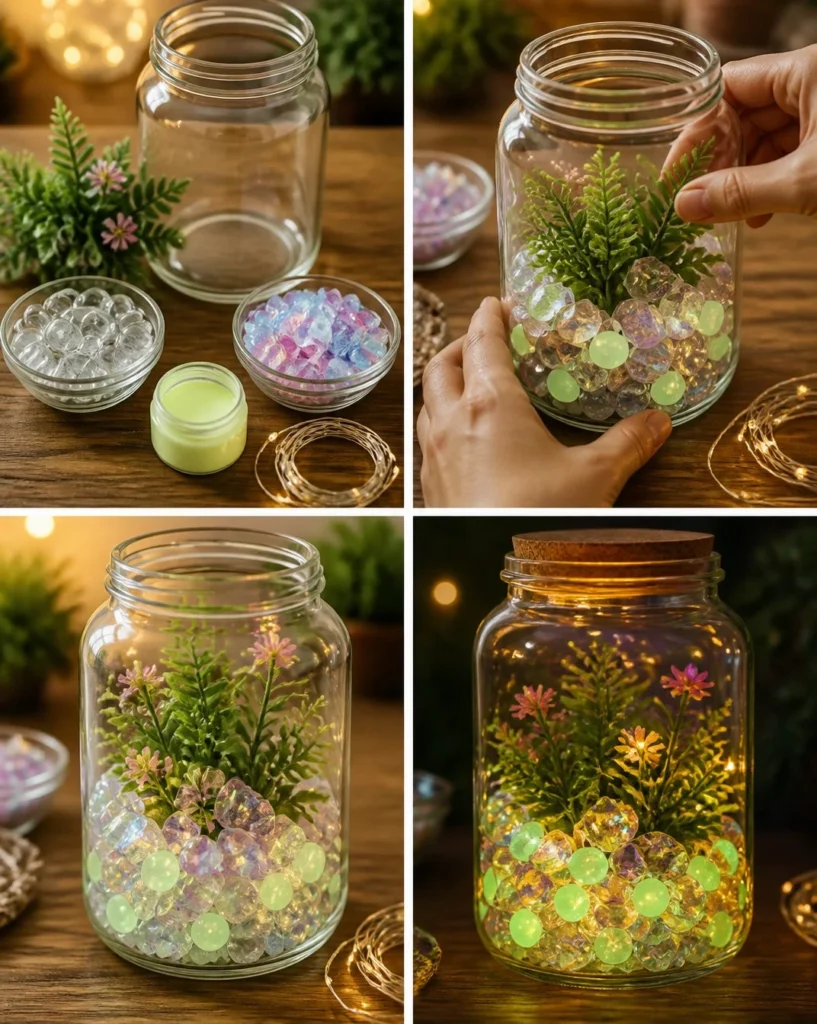
- Dot several decorative glass pebbles with glow-in-the-dark paint and let them dry completely.
- Layer the painted pebbles with iridescent stones inside the clear jar.
- Arrange the miniature faux plants among the stones.
- Weave the battery-powered micro fairy lights carefully through the arrangement.
- Charge all the glow-painted details under bright light for a few minutes, then switch on the fairy lights.
Last Step: Don’t forget to leave a rating and comment below! It helps other readers find the best DIY projects — and it helps us too!