Crystal Cloud Raindrops bring a delightful shimmer to any window or shelf. As you watch the crystallization process unfold, your fluffy cloud transforms into an enchanting display of sparkling raindrops. This fun science-inspired craft combines creativity with a captivating science lesson on crystal growth. You may also find Baking Soda Crystal Growing Trees useful.
To create your own Crystal Cloud Raindrops, you will need the following materials: white pipe cleaners, blue pipe cleaners, borax, hot water, jars, string, and a pencil. The borax solution plays a vital role in forming the crystals that will adorn your cloud. An exciting feature of this project is the magical moment when the raindrops start to form. You may also find Baking Soda Crystal Heart Growth useful.
What makes this work
When you dissolve borax in hot water, you create a saturated solution. As the water cools, the borax molecules begin to settle and crystallize. This process happens overnight, leading to the formation of beautiful crystals that will cling to your pipe cleaner cloud. The texture of the crystals adds an extra sparkle, making your creation truly stand out. You may also find Baking Soda Rainbow Crystal Forest Rainbow Crystals useful.
Steps
Shape a small white cloud with dangling blue raindrops. This step is where your imagination can take flight. Create a fluffy cloud shape using white pipe cleaners, and form blue raindrop shapes hanging from your cloud.
Prepare a saturated borax solution by mixing borax with hot water until dissolved. In a jar, add hot water and gradually mix in borax. Keep stirring until it no longer dissolves. Be careful to avoid burns, and an adult should supervise or handle this step if needed.
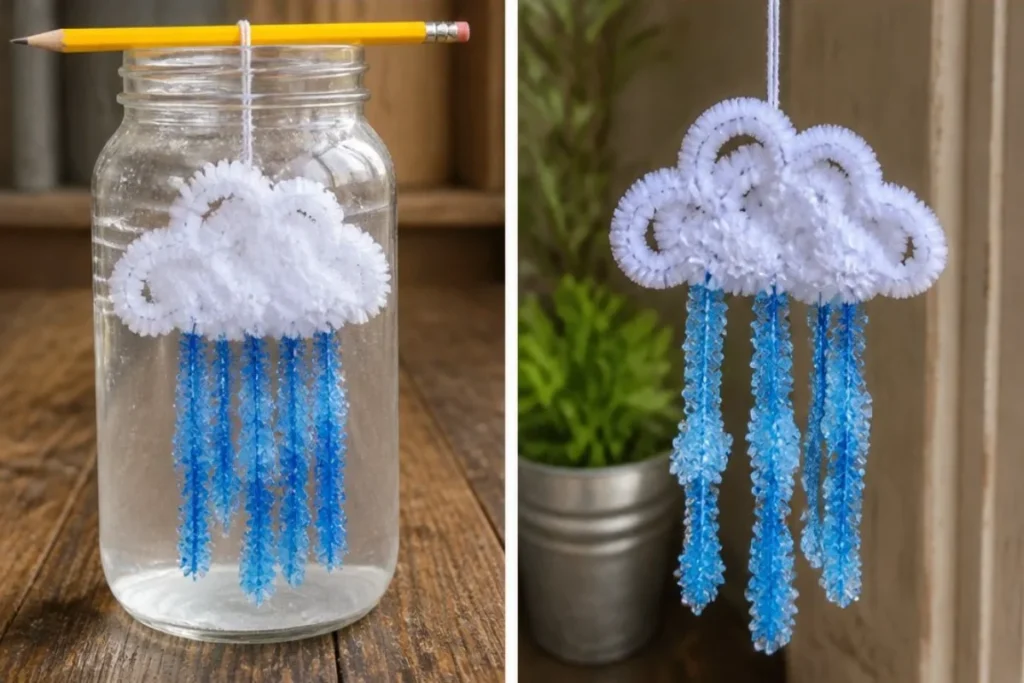
Suspend your fluffy shape in the solution using a string tied to the pencil. Tie a string around your cloud and balance the pencil over the jar. Ensure the cloud is fully submerged in the borax solution to allow for even crystal growth.
Leave it overnight. Patience is key here. While you sleep, the magic happens as crystals form around your cloud. In the morning, gently remove the cloud from the solution. You should see the beautiful crystals adhered to the surface, creating a stunning visual effect.
Let the crystals dry before hanging it up. Once removed, place your cloud in a safe spot to dry completely. The finished piece will sparkle in the light, making it an attractive decoration.
What goes wrong and how to fix it
Sometimes, the crystallization may not occur as expected. If your crystals are not forming, it could be due to inadequate mixing of borax or it not being fully saturated. Try adding more borax and ensure it completely dissolves in the hot water.
Additionally, the temperature of your solution matters. Allow the hot water to cool down after mixing, and avoid placing the jar in a drafty area. Stable temperatures promote better crystal growth.
Where to display it
Once dried, display your Crystal Cloud Raindrops in a sunny window or on a shelf. The sparkling crystals can catch the light beautifully, making it a perfect accent for any room. You can also create multiple clouds and hang them together for a more whimsical feel, similar to a colorful cloud ornament display.

Variations
Feel free to get creative! Consider using different colors for the raindrops or adding a few extra shapes. Pipe cleaners come in many colors, so make them vibrant and cheerful. Additionally, mixing a little food coloring into the borax solution may add fun hues to the crystals, similar to what you would find in crystal-growing trees.
FAQs
Can I use other materials instead of pipe cleaners?
Yes, you can explore different shapes like paper or cardboard. However, pipe cleaners hold their form better and make it easier for crystals to cling.
Why did my clouds not form well?
If your clouds don’t look fluffy, consider shaping them again with more bends and loops. This creates more surface area for the borax solution to adhere to.
How long does it take for the crystals to grow?
Leaving the cloud in the borax solution overnight typically works well. However, you can leave it longer, up to 24 hours, for larger crystals.
Can kids help with this project?
Absolutely! This hands-on activity is perfect for children when supervised by an adult, especially when handling hot water and borax.
How should I store my Crystal Cloud Raindrops?
Store them in a cool, dry place to prevent moisture from affecting the crystals. If they begin to lose their sparkle, a simple wipe with a dry cloth can help.
How durable are the crystals?
The crystals are reasonably sturdy but can be fragile. Handle them with care when moving or displaying them.

Conclusion
Creating your own Crystal Cloud Raindrops is a wonderful way to explore the beauty of science and art. For anyone looking for costume ideas that also reflect the fun of clouds and raindrops, check out this quick and easy rain cloud costume. Additionally, to understand the science behind these fascinating formations, you may want to read about the balance between warm rain and ice crystals. Enjoy your crystal crafting!
Follow us on social for more DIY ideas & inspiration!
Crystal Cloud Raindrops
Would you like to save this project?
By submitting you agree to receive this project and occasional emails. Unsubscribe anytime.
Materials
Materials
- 4 pieces white pipe cleaners to create the cloud shape
- 2 pieces blue pipe cleaners for the raindrop shapes
- 1 cup borax for crystal formation
- 2 cups hot water to create the saturated solution
- 1 piece string to suspend the cloud in solution
- 1 piece pencil to balance the string and cloud
- 1 jar jar to hold the borax solution
Directions
Preparation
- Shape a small white cloud with dangling blue raindrops using the white and blue pipe cleaners.
- Prepare a saturated borax solution by mixing borax with hot water in a jar until dissolved.
- Suspend the cloud in the borax solution using a string tied to the pencil. Ensure the cloud is fully submerged.
- Leave it overnight to allow crystals to form.
- In the morning, gently remove the cloud from the solution and let it dry completely before displaying.
Last Step: Don’t forget to leave a rating and comment below! It helps other readers find the best DIY projects — and it helps us too!